06 Nov

Introduction:
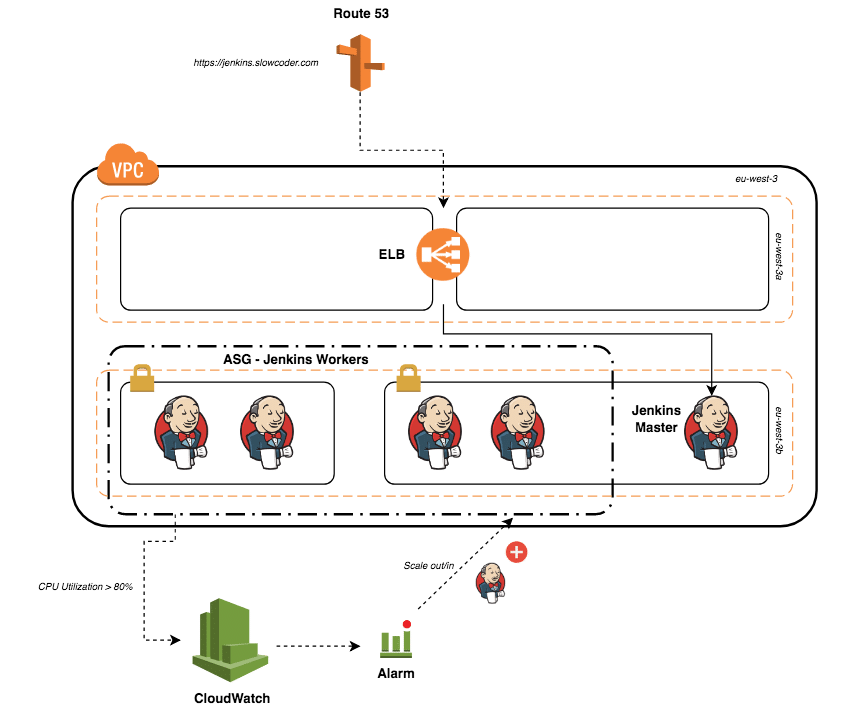
In this article, we are going to talk about Jenkins on AWS using best practices and recommendations to achieve best performance and high availability.
Continuous Integration (CI) :
Continuous integration is a software development practice in which developers regularly merge their code changes into a central repository, after which automated builds and tests are run. Continuous integration most often refers to the build or integration stage of the software release process and entails both an automation component (e.g., a CI or build service) and a cultural component (e.g., learning to integrate frequently). The key goals of continuous integration are to find and address bugs quicker, improve software quality, and reduce the time it takes to validate and release new software updates.
Continuous Delivery and Deployment (CD)
Continuous delivery is a software development practice where code changes are automatically built, tested, and prepared for production release. It expands upon continuous integration by deploying all code changes to a testing environment, a production environment, or both after the build stage has been completed. When continuous delivery is properly implemented, developers always have a deployment-ready build artifact that has passed through a standardized test process.

Why Use Jenkins?
Jenkins is a very popular product among AWS customers who want to automate their CI/CD pipelines.2
- It accomplishes all of the phases described in the previous section.
- It integrates very well across languages, platforms, and operating systems.
- It’s open-source software.
Jenkins works well on AWS and with AWS because it’s available on the AWS Marketplace, widely documented; and it’s very well integrated. Additionally, Jenkins plugins are available for a number of AWS services.
Installation
Master Node
1. From the AWS Management Console, launch the Amazon EC2 instance from an Amazon Machine Image (AMI) that has the base operating system you want.16 This example uses an Amazon Linux 64-bit AMI.
2. Choose a security group that will allow SSH access as well as port 80 or 8080 to access your Jenkins dashboard. You should only enable ingress from the IP addresses you wish to allow access to your server.
3. Connect to the instance via SSH
4. Update the yum package management tool.
$ sudo yum update –y
5. Download the latest Jenkins code package.
$ sudo wget -O /etc/yum.repos.d/jenkins.repo http://pkg.jenkins-ci.org/redhat/jenkins.repo
6. Import a key file from Jenkins-CI to enable installation from the package.
$ sudo rpm --import https://pkg.jenkins.io/redhat/jenkins.io.key
7. Install Jenkins.
$ sudo yum install jenkins -y
8. Start Jenkins as a service.
$ sudo service jenkins start
9. Configure Jenkins, now that it’s installed and running on your Amazon EC2 instance. Use its management interface at port 80 or 8080, or remotely access the server via SSH. In its default configuration, Jenkins versions 2.0 and later lock down access to the management interface.
The first time you use the dashboard at http://<your-server-address>:8080, you will be prompted to unlock Jenkins:
As noted on the user interface, you can find this password in /var/lib/jenkins/secrets/initialAdminPassword. Paste the value into the password box, then choose Continue.
10. The installation script directs you to the Customize Jenkins page. Choose Select plugins to install and select any plugins appropriate to your particular installation. For our example, ensure that the Git plugin (under Source Code Management) and SSH Slaves plugin (under Distributed Builds) are installed.
Worker Nodes
A Jenkins worker node is an instance that offloads build projects from the master. The Jenkins master makes the distribution of tasks fairly automatic and is configurable per project. Users accessing Jenkins using the management dashboard can track build progress, browse Javadoc files, and view and download test results without needing to be aware that builds were done on worker nodes.
1. Launch a new instance into the same VPC that you launched the Jenkins master into. For this example, we launch the instance from an Amazon Linux 64-bit AMI. (Note that you will not have to install Jenkins on your workers.)
2. Attach a security group that allows ingress to the worker nodes via SSH from the internal IP address of the master Jenkins install.
3. Connect to the master instance via SSH.27
4. Create a pair of authentication keys from the ~/.ssh directory:
$ cd ~/.ssh $ ssh-keygen -t rsa
5. Copy the public key—you’ll need it in step 7.
$ cat ~/.ssh/id_rsa.pub
6. From another terminal window, connect to the worker instance via SSH.
7. Edit ~/.ssh/authorized keys and add the contents of the public key from step 5 to the end of the file. Take care not to include any line breaks that you may have copied as you captured the public key.
8. Return to the terminal where you connected to the master instance via SSH, and verify that you can connect to the worker instance the same way.
$ ssh [email protected]
Configuration
On the master instance, log in to the Jenkins management dashboard, choose Manage Jenkins, then Manage Nodes, and finally New Node. For each worker node, perform the following steps:
1. Name your node and choose Permanent Agent. Then choose OK to continue. (If you have already configured a worker node, you can choose Copy Existing Node to duplicate a previous configuration.)
2. Add a description and set the number of executors you wish to run on the worker node. Plan for two executors per core.
3. Set Remote Root Directory to an absolute path, like /home/ec2- user/jenkins. The remote root directory will cache data such as tool installations or build workspaces. This prevents unnecessary downloading of tools, or checking out source code again when builds start to run on this agent again after a reboot. Set any other options you want.
4. For the launch method, choose Launch slave agents on Unix machines via SSH and set the host to the private IP address of your worker node.
5. Add your credentials by choosing Add, then SSH Username with the private key.
6. Add the value “ec2-user” for Username.
7. For Private Key, choose to Enter directly, then paste in the value of the private key (~/.ssh/id_rsa) from the master instance, and choose Add. Finally, choose Save to save your worker node configuration.
8. Select the worker from the nodes table, and then choose the Launch agent.
After you have configured your worker nodes, it’s important to change the number of executors to 0 on the master. Select the master from the nodes table, and configure the “# of executors” settings to 0. This ensures that project builds will now happen on the worker nodes, and not on the master.
Test your Jenkins on AWS setup by adding a new project and performing a build.
Create an Amazon EFS file system
1. In the AWS Management Console, go to the Amazon EFS dashboard.32
2. Choose Create File System.
3. Select the target VPC into which you want to deploy your file system. This should be the same VPC where you put your Jenkins setup.
4. Under Create, mount targets configure the mount targets you need. Instances connect to a file system via mount targets you create. We recommend creating a mount target in each of your VPC’s Availability Zones so that Amazon EC2 instances across your VPC can access the file system.
When choosing a security group, ensure that Amazon EFS allows traffic from your Jenkins instances. These security groups act as a virtual firewall that controls the traffic between them. If you don’t provide a security group when creating a mount target, Amazon EFS associates the default security group of the VPC with it. That group allows all traffic across instances so it will serve our purpose.
Regardless, to enable traffic between an EC2 instance and amount target (and thus the file system), you must configure the following rules in these security groups:
a. The security groups you associate with a mount target must allow inbound access for the TCP protocol on port 2049 for NFS from all EC2 instances on which you want to mount the file system.
b. Each EC2 instance that mounts the file system must have a security group that allows outbound access to the mount target on TCP port 2049.
5. Choose the Next Step.
6. Add tags if you need them, and choose performance mode. We recommend General Purpose performance mode for most file systems. Max I/O performance mode is optimized for applications where tens, hundreds, or thousands of EC2 instances are accessing the file system — it scales to higher levels of aggregate throughput and operations per second with a tradeoff of slightly higher latencies for file operations.
7. Choose the Next Step.
8. Review your configuration and then choose Create File System.
Setting Up Your Jenkins on AWS Host
1. Launch an instance into your VPC from an AMI (our example uses an Amazon Linux 64-bit AMI). Follow the instructions given earlier, and be sure to pick a security group that allows SSH and HTTPS (ports 22 and 8080, respectively).
2. Connect to the instance via SSH.
3. Update the yum package management tool: $ sudo yum update -y
4. Install nfs-utils, if necessary:
$ sudo yum install nfs-utils
If you choose the Amazon Linux AMI 2016.03.0 when launching your EC2 instance, you won’t need to install nfs-utils because it’s already included in the AMI by default.
5. Create a folder for mounting your $JENKINS_HOME folder:
$ sudo mkdir –p /mnt/JENKINS_HOME
6. Mount the Amazon EFS file system to this directory. 33 Use the following command, replacing <file-system-id> and <aws-region> placeholders with your file system ID and AWS Region,34 respectively:
$ sudo mount -t nfs4 -o vers=4.1 $(curl -s http://169.254.169.254/latest/meta-data/placement/availability-zone).<file-system-id>.efs.<aws-region>.amazonaws.com:/ /mnt/JENKINS_HOME
7. Install Jenkins:
$ sudo wget -O /etc/yum.repos.d/jenkins.repo http://pkg.jenkins-ci.org/redhat/jenkins.repo

$ sudo rpm --import https://pkg.jenkins.io/redhat/jenkins.io.key

$ sudo yum install jenkins –y
8. Change the ownership of the newly created mount:
$ sudo chown jenkins:jenkins /mnt/JENKINS_HOME
9. Update Jenkins configuration:
$ sudo vi /etc/sysconfig/jenkins
Inside that file, replace the value of $JENKINS_HOME with /mnt/JENKINS_HOME. If there are already configuration files in the existing $JENKINS_HOME directory (/var/lib/jenkins, by default), make sure to move them to the new /mnt/JENKINS_HOME directory.
10. Launch Jenkins on AWS:
$ sudo service jenkins start
11. Make sure the share auto-mounts when the box starts up:35
$ sudo vi /etc/fstab
Add the line:
<mount-target-DNS>:/ /mnt/JENKINS_HOME nfs defaults,vers=4.1 0 0
Replace <mount-target-DNS> with the DNS name of your Amazon EFS server. (You used that DNS name when mounting the Amazon EFS volume on the machine earlier, in Step 6.)
Conclusion:
In this article we demonstrated how to install and configure Jenkins on AWS, we highly recommend you to check this white paper for more advanced knowledge,at AWS PS we’re happy also to configure the entire infrastructure to our clients by using our managed service,