31 Oct
Introduction:
Increasing EBS disk space is a simple process that can be easily achieved from the AWS console, and you can follow aws documentation to implement it.
so the question here, what about reducing EBS disk space, in some cases where you find your self required to do that, for example, you find out later you overestimated the disk space required and you want to reduce the cost, or you move part of the application storage to S3 or EFS and you have a plenty of space you don’t use, in this article we will talk about how to shrink EBS volume and reduce the disk space.
Requirement:
This tutorial is applied on Centos and Redhat 7 environment where partition type is XFS, XFS is the standard partition types for these operating systems, to confirm you have this partition type use the command below:
file -sL /dev/sd*You will need another instance, make sure that instance was not created with the same image or snapshot because this means both volumes will have the same UUID, and you cannot mount 2 volumes with the same UUID under one instance.
Also, you will need a new volume with the file size (shrunk) which will ultimately become the resized EBS volume.
Note: make sure the instance and volumes you spin are with the same availability zone as your original instance.
Instructions:
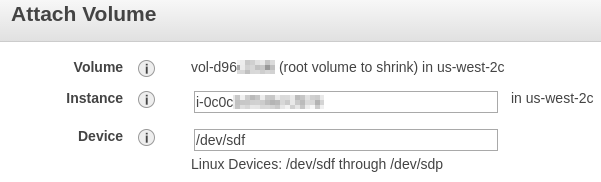
1) Attach volumes to the new server:
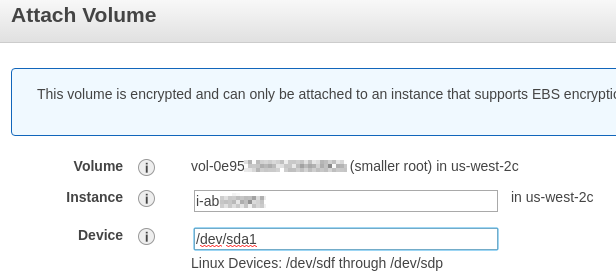
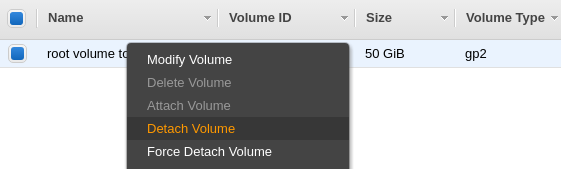
This includes both the new volume and volume to be resized, you need first to detach the large disk from the original instance, then from the AWS EC2 console under volumes, attach the large EBS as /dev/sdf and the new volume as /dev/sdg
2) Format the new disk:
login as SSH to the new server and use fdisk command to format it
root@aws:~# fdisk /dev/xvdg

Welcome to fdisk (util-linux 2.27.1).
Changes will remain in memory only, until you decide to write them.
Be careful before using the write command.

Device does not contain a recognized partition table.
Created a new DOS disklabel with disk identifier 0x1db62587.

Command (m for help): n
Partition type
   p   primary (0 primary, 0 extended, 4 free)
   e   extended (container for logical partitions)
Select (default p): p
Partition number (1-4, default 1):
First sector (2048-41943039, default 2048):
Last sector, +sectors or +size{K,M,G,T,P} (2048-41943039, default 41943039):

Created a new partition 1 of type 'Linux' and of size 20 GiB.

Command (m for help): w
The partition table has been altered.
Calling ioctl() to re-read partition table.
Syncing disks.
3) Create an XFS partition from the new volume:
root@aws:~# mkfs.xfs /dev/xvdg1
meta-data=/dev/xvdg1             isize=512    agcount=4, agsize=1310656 blks
         =                       sectsz=512   attr=2, projid32bit=1
         =                       crc=1        finobt=1, sparse=0
data     =                       bsize=4096   blocks=5242624, imaxpct=25
         =                       sunit=0      swidth=0 blks
naming   =version 2              bsize=4096   ascii-ci=0 ftype=1
log      =internal log           bsize=4096   blocks=2560, version=2
         =                       sectsz=512   sunit=0 blks, lazy-count=1
realtime =none                   extsz=4096   blocks=0, rtextents=0
4) Mount both disks to the new server
root@aws:~# mkdir /mnt/xvdf1
root@aws:~# mkdir /mnt/xvdg1
root@aws:~# mount -o ro /dev/xvdf1 /mnt/xvdf1
root@aws:~# mount /dev/xvdg1 /mnt/xvdg1
5) Clone Disk content to the new disk
In this tutorial, we will use tar to archive the content and then extract it in the new volume, you can ignore socket errors.
root@aws:~# cd /mnt/xvdf1
root@aws:/mnt/xvdf1# tar cSf - . | cat | (cd ../xvdg1/ && tar xSBf -)
6) Fix disk UUIDs:
In this swap we will assign the correct UUIDs of the disk to make sure the new resizes volume will contain the right UUID with files located in the disk, to get UUID values for both disks run the following command:
root@aws:/mnt/xvdg1# blkid
/dev/xvda1: LABEL="cloudimg-rootfs" UUID="567ab888-a3b5-43d4-a92a-f594e8653924" TYPE="ext4" PARTUUID="1a7d4c6a-01"
/dev/xvdf1: UUID="0f790447-ebef-4ca0-b229-d0aa1985d57f" TYPE="xfs" PARTUUID="000aec37-01"
/dev/xvdg1: UUID="6094350f-7d18-4256-b52e-6dbf5f196219" TYPE="xfs" PARTUUID="1db62587-01"
Ignore /dev/xvda1 because its the OS root for the new machine, now we need to grab 0f790447-ebef-4ca0-b229-d0aa1985d57f && 6094350f-7d18-4256-b52e-6dbf5f196219
so we will run the commands below:
We’re already in /mnt/xvdg1/ from when we ran the tar pipe, so the file paths are relative to this point:
root@aws:/# cd /mnt/xvdg1
root@aws:/mnt/xvdg1# sed -i -e 's/0f790447-ebef-4ca0-b229-d0aa1985d57f/6094350f-7d18-4256-b52e-6dbf5f196219/g' etc/fstab root@aws:/mnt/xvdg1# sed -i -e 's/0f790447-ebef-4ca0-b229-d0aa1985d57f/6094350f-7d18-4256-b52e-6dbf5f196219/g' boot/grub2/grub.cfg
root@aws:/mnt/xvdg1# sed -i -e 's/0f790447-ebef-4ca0-b229-d0aa1985d57f/6094350f-7d18-4256-b52e-6dbf5f196219/g' boot/grub/grub.conf
root@aws:/mnt/xvdg1# sed -i -e 's/0f790447-ebef-4ca0-b229-d0aa1985d57f/6094350f-7d18-4256-b52e-6dbf5f196219/g' boot/grub/menu.lst
7) Reattach the new volume to the original server:
here is the moment of truth :), reattach the resized disk to the new server start it, try to access SSH and verify disk space, if you’re unable to access the server, you can view instance screenshot.
Conclusion:
There is no straight forward to shrink disk space from AWS console, however with this tutorial you can have it reduce with the steps above.